
Crud Busting
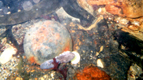
Place anything metal in the sea for a couple of hundred years and a process called concretion takes place. This is where small particles of sand, rock and debris attach themselves to the object and weld themselves together to encase the metal. Given the right conditions a piece of concretion the size of a football can entomb nothing more than a small ships nail. At Seadart we call this concretion "Crud", and it has to be removed.
A close inspection is carried out before the Crud is split open, just to see if there is anything obvious that requires careful attention. It is advisable to use some sort of eye protection when hammering at the concretion as Crud chips will fly everywhere. If you do not have any industrial goggles then use your diving mask. Also it is advisable to use surgical gloves as the crud usually badly stains the skin and gets under the fingernails. It can be quite unsightly and may take days to remove.
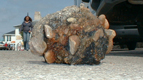
Using a large chisel and lump hammer we now set about the task of breaking it down into smaller pieces. Constantly passing the smaller pieces over a metal detector, discarding those that do not show a reading. At times small items can be seen sticking out of the concretion and these have to be carefully removed, items such as nails/buttons/musket shot etc.
Chip off as much crud as you can around any metal pieces and with what is left you can now put into brick acid, patio cleaner will also do but it is not so strong. We use a large coffee jar for the brass artifacts and less valuable bits. Put all your artifacts in and fill with neat brick acid, it will spill/bubble over so be careful where you do the filling, remember this is acid you are dealing with. When it has settled put the top on and let it cook. Unfortunately the smell is vile, a bit like stink bombs.
After a couple of days empty out the acid, fill with water to rinse off all traces of acid. Wash artifacts with warm soapy water and use a nailbrush for the stubborn bits, you may need to repeat this procedure a couple of times. Finish off with some good old Brasso.

For more valuable and delicate items brick acid is a bit strong, so for gold and silver we use a system called Reverse Electrolysis.
You need a glass bowl, battery charger, stainless steel clamp, (one of those surgical arterial clamp type thingies that rod and line fishermen use for getting the hook out of the fishes mouth - lots under Swanage pier) a stainless steel bolt and a packet of Soda Crystals.
Connect the artifact to the clamp and connect the negative lead of the battery charger to the clamp. Connect the live lead to the stainless steel bolt. Put both into the bowl but make sure they are not touching. The closer you get the bolt and artifact together the better the reaction. Add half a dozen or so spoonfuls of soda crystals and add boiling water, just enough to cover the artifact. Switch on the battery charger and leave for about 30 mins or so.
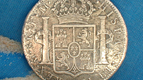
As soon as you turn on the charger fine bubbles should start coming off the artfact, this is ok. Switch off battery charger and remove the artifact. Finally wash clean in warm soapy water. You may find that all the stains and crud might not come off at the first session so just keep on repeating the process.
You can also lay the artifact on some tin foil put in a couple of spoon fulls of soda roll the tin foil and clamp to the artifact. This does help speed the process.